Review: Lisanatti Almond Cheese + Bonus Recipe: Baked Ziti

Almond Cheese

Holy crap, this cheese is so good! I mean, I still remember how dairy cheese tastes (sometimes the memory haunts me) and I’m not delusional enough to pretend that some of the cheese substitutes I’ve had to stomach were anywhere near it, but holy crap, this cheese is so good! Almond cheese, who would have known, actually melts divinely and has the same taste and texture of mozzarella cheese made from dairy. Oh, except that it’s not destroying another living creature’s quality of life during its production and doesn’t contain hormones, antibiotics, and puss from sores on cows’ udders which inevitably occur when they spend a lifetime having powerful suctioning devices strapped to their pink bits.

Did I mention how delicious it is? I’m not kidding. I had some stuff made from tapioca that was pretty good, and some individually sliced faux cheddar that was…well, it was like government cheese’s strange hippie uncle (the one who never showers or wears deodorant)…but this stuff blows that crap out of the water.

Lisanatti Almond Mozzarella. Look for it in your grocery or health food store, and if they don’t carry it, ASK for it. Your grocer can’t read your mind. Otherwise he’d be out playing high stakes poker instead of restocking your favorite heavy duty tampons, mopping up toddler vomit and contemplating life as a pole dancer while that woman with fifty cats complains about the high price of fruit and counts $60 worth of change from a tube sock to pay for Meow Mix.

In case you’re wondering, I ate a slice of it plain. Yum. Then, I made baked ziti.

(1) I first boiled 1 cup of organic ziti in 6 cups water,

(2) drained it, mixed in 1/2 cup of Newman’s Own Mushroom Marinara,

(3) added 1 c sliced baby bella mushrooms and 1/2 tsp sea salt

(4) spooned it into a small ovensafe dish, grated some of that almond cheese over everything,

(5) covered it in foil and baked at 350F until the cheese melted through and the mushrooms softened (about 8 min)

Slice it, serve it, love it, CHEESE IT!

Neatloaf

Meatloaf has long been hailed a staple of American cuisine that helps to stretch a buck and feed your family for pennies on the dollar as opposed to giving them actual meat. Why should this blue collar classic technique of adding mostly bread crumbs, cracker, or cereal to a pound of greasy low grade beef in order to stuff their kin on a budget be limited to the omnivores? Hey, it’s not.

As you know, not every vegan is a Hollywood actor or rich so-and-so. Some of us live on a real world budget and Vegetarianism/Veganism can not only be accessible to anyone, it can, in fact, be a cheap way to maintain a healthy diet! Just think about how much a pound of no frills carrots costs compared to a pound of beef or turkey. And is the carrot cut with hunks of would be discarded gristle and lard? Is it swimming with calories and colon-clogging inferior proteins? I hear people say all the time that they’re not wealthy enough to go on a diet, and they’re right. Unsatisfying diet shakes and bars that taste like chocolate-flavored cow pies can be really expensive.

Dairy and Meat can actually be the most expensive things on the average grocery list as well as the most detrimental to your health and waistline. Substitutes for natural dairy and meat, while generally much healthier, can be very costly, but check out the dry goods in your grocery store. You’ll find substantial proteins like Gluten, TVP (Textured Vegetable Protein) and not to mention LEGUMES that are way better and more cost efficient than anything that bleeds or slapped with a flashy brand name. Here is a great way to stretch a buck and fill your belly on TVP:


2 cloves fresh Garlic

4 oz Onion

4 oz Carrot

4 oz Celery

3 T Soy Sauce

1-2 Roma Tomatoes

½ t Mustard Powder

½ t Paprika

¼ t Black Pepper

¼ – ½ t Sea Salt

4 T Nutritional Yeast

2 T ground Flax mixed with 3-4 T Water

1 c TVP (Textured Vegetable Protein)

¾ c Vegetable Stock

1 cup Bread Crumbs or 1 Sleeve of Saltines finely ground

1 T Earth Balance (or butter substitute of your choice)

Optional: Ketchup


For this recipe, I chopped all the vegetables in a food processor. You are welcome to chop these by hand and you will see larger chunks of vegetable matter in your loaf if that is what you like. Just be sure to chop them finely because you need them to cook quickly and not get ahead of the TVP.

Here is my food processor shortcut:

First, finely grind the garlic in the processor,

Add Carrots, pulse for 5 seconds

Add Onions, pulse for 2 seconds,

Add Celery, pulse for 5 seconds.

You should have semi-fine bits of vegetables but still be able to distinguish the different types. You can mash them into a fine pulp if you want, but I like to see the bits of carrot and what-not in my loaf.

Start warming the oven up to 350F

Warm the Vegetable Stock, combine it with the TVP and allow it to sit while you sauté the vegetables in Earth Balance (or butter substitute) with the Salt, Pepper, Paprika, and Mustard. The cooking should be quick and the purpose is to bring the flavor out of the vegetables so the TVP will soak it up and not have separate bland bits floating around in the loaf like insipid barflies waiting for someone to chew them up and spit them out. Heat the pan, melt your Earth Balance, add veggies and cook for no more than 3 minutes on Medium heat. Meanwhile, add your tomatoes to the blender/food processor and practically liquefy them. Add them to the veggies in the pan.

By now, your TVP should have soaked up most of the water, so add it as well as the Flax, Soy Sauce, and Nutritional Yeast to the pan as well. At this point, the contents of the pan should be cool enough that you can stick your hand in there and blend everything by hand. If it’s not, first get your hand out of there, genius, and then either use a spoon to stir or let it cool down.

Mix in the Breadcrumbs or Crackers until you have a mixture that retains its shape. Add them slowly and realize that you may need more or less, depending upon how juicy your veggies (namely, your tomatoes) were and how well the TVP soaked up the stock.

Line an oven safe container with foil and add a small drizzle of cooking oil or Earth Balance to keep the loaf from sticking to the bottom. Place the loaf mix into the pan and shape it, then if you must, add ketchup to the top of your loaf.

Cook this for about 10 minutes or until you’ve achieved the desired dryness. There should be no need to cook out any bacteria as you would with meat or eggs, in fact, you can eat this completely raw if you want. Savage.

To keep that down home feel, serve your loaf with mashed potatoes (made with vegetable stock instead of milk) and Earth Balance. You can also add some greens like asparagus, Brussels sprouts or green beans.

If you choose, you can modify this recipe by adding walnuts, piñones (pine nuts) or spinach to the veggies before sautéing or substituting the garlic for a heaping spoonful of pesto. Go crazy.

Pasta Salad

I’m not very big on pasta for a couple of reasons: for one, they add unnecessary starch to your diet, and secondly, I just don’t care for the taste of “whole-wheat” pasta…seriously, it tastes like boiled cardboard to me. I know that for many, pasta is an old stand-by simply because it’s cheaper and easier than a truck stop hooker. To me, it’s also nearly as unappealing. On the other hand, doll it up as a pasta salad with some high quality olive oil, and I quickly change my tune.

For this recipe, I generally use organic corkscrew pasta (screwdles, fusilli, whatever) type pasta. You can use tricolor if you so insist, but nutritionally speaking, the smidgen of tomato paste or spinach added to make the other colors is negligible and you’ll have lots of color anyway because of all the lovely vegetable we’ll be adding.

Ingredients:

1 cup Dry Pasta (or you fresh made pasta if you’re lucky enough to find it)

½ T Canola Oil

2 cloves Garlic

½ cup diced Roma Tomatoes or halved Cherry Tomatoes

½ cup chopped Asparagus

¼ cup minced Red Onion or Sweet Onion

¼ cup sliced Green, Black, or Mixed Olives

½ cup chopped or sliced Mushrooms (baby ‘bellas preferred)

1 c Baby Spinach

Now, some cooks say to add salt to the water you boil your pasta in, some say don’t, and others (who don’t really know what they’re talking about) say it makes no difference. Well, if you paid attention in you middle school science class, you would know that salt changes the boiling point of water. So there. I say that if you’re cooking pasta or other processed items, add salt as it will allow the water to reach a higher temperature without boiling so violently. If you’re blanching veggies, leave the salt for after cooking to preserve the texture and color. With rice, add the salt last also, to allow the starches to fluff the grains, but with pasta, salt the water first to keep that boiling point higher and lock the starch in the place for an al dente texture. No one with teeth likes mushy pasta.

Always use a large pot, even if it doesn’t seem like that much pasta. Allow it to move freely so that it doesn’t stick together and cooks evenly. Use a minimum of 6 cups of water for 1 cup dry pasta, plus 1 ½ cups water for every additional cup of pasta and add a generous pinch (½ – 1 tsp) salt to the water, bring it to a gentle boil, and add the pasta. Cook until the pasta is totally opaque and test it by cutting a noodle and seeing if the color is even all the way through. You may have heard that you can tell that spaghetti is done when you throw it at the wall and it sticks. While this is true and you can do this for with fettuccini, angel hair and other types of stick pasta, it doesn’t work well for screw shaped pasta, shells, or anything else really. When the pasta is done (should take no more than 15 minutes) strain it in a colander and rinse briefly with cold water. It is okay to rinse it for this recipe as you won’t need hot pasta. Just let it sit for a minute while you sauté the veggies.

In a large frying pan, heat ½ T canola oil. Heat 2 cloves of garlic sliced in half in the oil to release their flavor. Add asparagus into 1-2 inch pieces, tomatoes, olives, mushrooms (sliced if they are large) and clean baby spinach (optional.) Sauté until the spinach is wilted and the asparagus looks bright green. I like for my veggies to have some bite. Also, did you know that spinach is one vegetable that you should never eat raw? That oh-so-healthy spinach salad is depleting your calcium and changing you pH. Spinach is best eaten when at least lightly cooked (called wilted) or added to a soup. If it makes your teeth feel gritty when you eat it, you should have probably cooked it longer.

Ok, so your vegetables look done now, bright greens, reds, and purples…a feast for the eyes. Now, turn off the heat and add the pasta to the pan. Add about 3/ T of quality olive oil, ¼ tsp ground black pepper and ½ tsp sea salt. Mix it up, and now you’re done.

I prefer to eat this dish warm, but if you insist on eating it cold or having it later, be sure to ice it down as quickly as possible by spreading it in a wide dish and immediately refrigerating it. You can give it an ice bath of use a freezer safe dish that’s been previously chilled and stirring with a frozen spoon. Pasta is starchy and provides ideal nourishment for bacteria. Contrary to popular belief, salmonella does not taste like chicken: it tastes like painful bowel issues and a trip to the emergency room. Some folks like to add vinegar to make it more hostile for the bacteria, but I feel that vinegar brings out bitterness in starchy foods. Just cool it down to 36 degrees Fahrenheit or lower and make sure it stays cold until it’s time to eat.

Homemade Soyrizo

To capture the essence of chorizo, a trademark Mexican dish made from pickled pork and flavorful seasonings, you need to begin with authentic ingredients. Meet guajillo peppers:

Guajillo Peppers

Guajillos are a variety of dried peppers used in several traditional Mexican dishes. Drying peppers smoothes out their burn, sweetens them, and leaves them with a mellow, full bodied fragrance and flavor. They can be found in the “ethnic” isle of the grocery store, though you may also find them next to the produce alongside other dried goods. You know you have good ones when they are deep garnet red and pliable (like very thin fruit leather) and don’t crack too badly when you try to pull them open.

Now that you are learned in selecting quality dried peppers, you can begin on the rest.

Homemade Soyrizo:

1c Water

1c Apple Cider Vinegar

4 dried Guajillo (wah-hee-yo) Peppers

4 cloves Garlic

4 whole Cloves

¼ t dried Mexican Oregano (or ½ t fresh Oregano if you’re lucky enough to have some on hand, but make sure it’s Mexican, not Italian, for an authentic flavor)

¼ t Black Pepper

¼ t powdered Cumin

2 t Salt

1 ½c Textured Vegetable Protein (TVP)

Measure your liquids into a 20-32oz pot and bring them to a boil.

Meanwhile, pop or cut the stems from the peppers, slit them lengthwise, and pull out any seeds and whitish veins you see inside the pepper. Add them to the boiling vinegar solution and remove from heat, allowing them to rest about 10 minutes and reconstitute. You’ll know they’re ready when they are cloudy and soft.

Strain liquid from the peppers over a 32oz glass or plastic lidded dish and add the peppers, along with ¼ of the liquid, garlic, cloves, and oregano a food processor. If you don’t have a food processor, cool everything first by placing in the fridge or freezer in a plastic container before liquefying it in the blender. Blend this carefully at low speed; otherwise your prep area is going to look like a set on CSI Miami.

To the vinegar solution add Salt, Pepper, and Cumin, stir to dissolve salt, and add TVP to the hot liquid.

Into the pickling TVP, strain your pepper mush through a fine colander or sieve to remove all unpleasant pepper skins and twiggy bits of oregano and cloves. Use a rubber spatula to get all the good stuff out of the processor/blender, and rinse it before using the spatula to mix the peppers with your TVP…or you will leave gross little pepper skins in your soyrizo that stick to the back of your throat when you’re eating. Or leave them in. What’s breakfast with the family without an awkward moment or two?

When everything is mixed, have a little taste. How is it? Hell yes, it’s delicious! It doesn’t stop there: it’ll taste even better tomorrow. After a few days in the fridge, the flavors will really get to know each other well, like new sorority sisters who bonded over a week of hazing and are having a delicious pillow fight in your mouth, talking about their feelings, and experimenting with their sexuality. ¡Buen Provecho!

Add up the cost of ingredients…did you or did you not wind up paying less per ounce of homemade deliciousness versus what you would have bought at the store? I know you did. The stuff you made is going to last…oh boy, you’re going to have soyrizo for at least a month because you just made enough to fill about three packages of store bought and thanks to the pickling process, it’s going around a long time. You can share or trade with a friend, or freeze it after the initial 24 hours and hoard it all like a greedy bastard. Whatever you do, don’t store it at room temperature or leave it out, as this will cause it to turn and mold.

You can add this to make Soyrizo Potatoes from my post in February 2012, or add them to January 2012’s entry, Tofu “Eggs.”

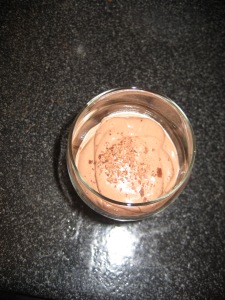
Chocolate Mousse (Vegan)

a chocolatey soy-based indulgence

Chocolate Mousse

½ cup Vegan Chocolate Chips

1 package soft tofu

2 teaspoons Ener-G eggs

2 Tablespoons Soy Milk

Good news, this is a very simple blender recipe! Just throw things in the right order and you’re set.

Ok, it’s mostly a blender recipe. You’re going to need to melt those chocolate chips. You can double boil them, which is the recommended method of melting real chocolate, or nuke them.

To double boil them (which does not mean “boil twice,” I looked it up), fill the bottom pot with 1-2 cups water (depending on how big your double boiler is) and place your ½ cup of chocolate chips in the top. If, like me, you don’t own a double boiler, take a pot and a heat safe bowl that fits over the top, covering it completely but doesn’t touch the bottom of the pot, and fill the pot with a cup or so of water, placing the bowl on top. Steel or Pyrex bowls are recommended for double boiling. As soon as the chips look like they are melting, turn the heat off! The heat from the water and steam will do what it needs, so just take a rubber spatula and mix the chocolate so it heats through evenly.

If you’re going to microwave the chocolate, place it in a microwave save bowl and heat it no more than 30 seconds at a time on medium power. Every 30 seconds, open the door and stir the chocolate until it looks 80% melted. When it does, just keep stirring because the warm chocolate will melt what little is still solid.

It’s important not to overheat chocolate or it will take on a chunky, clumpy texture. At this point, your chocolate may not be tempered, so if you try to make nice truffles, don’t be surprised if the exterior “blooms” or takes on a chalky appearance. Tempering chocolate to a glossy finish requires a different technique, but it doesn’t matter because we’re going to make a simple mousse.

OK! Now, that your chocolate has melted (shouldn’t take more than a few minutes) you can place the soy milk and egg substitute into the blender, frappe until frothy and well blended, then add the entire package of tofu, minus the juice. Blend this well until uniformly smooth, then stop, take a big spoonful, and blend it into the chocolate. This will keep the chocolate from turning chunky because of the cold from the tofu. Next, place the lid back on the blender, but remove the tiny cap from the top of the lid. Blend on low speed and pour the chocolate as it blends. Now, hit high again for a few seconds so that everything is light and airy. You can chill this mixture, or you can serve it immediately. Some suggestions for garnish are chocolate sprinkles or shavings, or a large chocolate curl.